


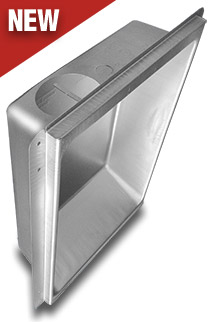
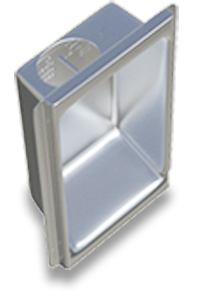
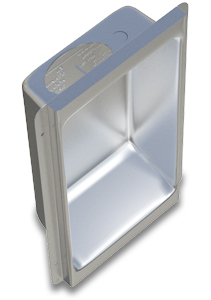
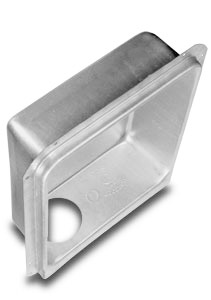
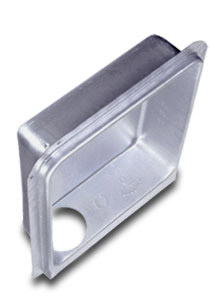
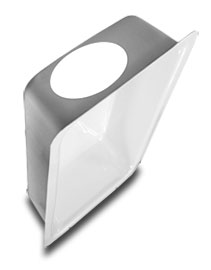
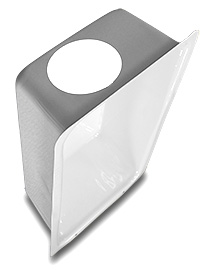
Model 480
Sku DB-480
(Upward & Downward | Pedestal or Floor)- 22 gauge aluminized steel weighing 7 pounds each
- Top port measures 4 5/16" with very slight oval shape
- Distance from nailing flange to rear of box is 4 1/4"
- Overall measurements: 23 1/2" h x 17 3/8" w x 5 1/8" deep
- Inside measures 14" wide x 20 1/2" tall
- Five units per carton, 24 cartons per pallet, ships as a class 70
Model 480 Versatility
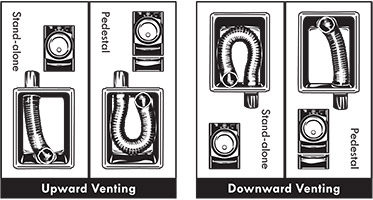
Model 480 has a larger receiving area to safely collect exhaust hose whether it's entering the wall at floor level or higher up on a pedestal. Designed for a 2 X 6 wall cavity, it can also be installed in a 2 X 4 stud space with a furring strip.
Installs on the bottom plate whether venting up or down and safely collects the transition duct as shown below.
Model 425
Sku DB-425
(For Upward Exhaust Direction)- 22 gauge aluminized steel weighing 4.14 pounds each
- Top port measures 4 1/8" with very slight oval shape
- Distance from nailing flange to rear of box is 4 1/4"
- Overall measurements: 21" h x 12 1/2" w x 5 1/8" deep
- Inside measures 9 1/2" wide x 18 1/4" tall
- Five units per carton, 36 cartons per pallet, ships as a class 70
425 to Roof in 2X6 Wall
Most popular model. Check this link for graphic. Perfect for a 2 X 6 wall, the model 425 gets installed as low as possible so that the bottom tab is at or slightly below the finished floor level.
Since all dryers vent from the center bottom of the appliance, this configuration allows the flex hose to compress upward neatly and safely when the dryer is pushed flush to the wall.
425 to Roof in 2X4 Wall
Adding a furring strip to stud makes room for the deeper box with round port. Check this link for graphic.
Designed for a 2 X 4 wall, the model 350 has an oval hole to accomodate the way a thin wall cavity compresses the pipe. (Video: Flex Hose Installation Tips) Install the 350 as low as possible so that the bottom tab is at or slightly below the finished floor level.
Since all dryers vent from the center bottom of the appliance, this configuration allows the flex hose to compress upward neatly and safely when the dryer is pushed flush to the wall.
425 Out Through 2X6 Wall
Be certain there is enough insulation behind dryer for cold climates. Check this link for graphic. It can also be mounted on its side.
Perfect for a 2 X 6 wall, the model 425 gets installed as low as possible so that the bottom tab is at or slightly below the finished floor level.
Since all dryers vent from the center bottom of the appliance, this configuration allows the flex hose to compress upward neatly and safely when the dryer is pushed flush to the wall.
425 Out Through 2X4 Wall
At 4.25 inches deep, it can fit in a 2 X 4 wall once one side of the wall is fitted with a furring strip beneath the drywall. This allows enough room so the duct does not have to be compressed. Check this link for graphic.
Install as low as possible so that the bottom tab is at or slightly below the finished floor level.
Since all dryers vent from the center bottom of the appliance, this configuration allows the flex hose to compress upward neatly and safely when the dryer is pushed flush to the wall.
425 Up / 2X6 Wall / Stacked Dryer
Most popular model. Check this link for graphic. See this INSTALL GUIDE for locations of stackable unit exhausts for the major manufacturers.
Perfect for a 2 X 6 wall, install the model 425 so the bottom lines up about an inch below where the dryer vents.
This configuration allows the flex hose to compress upward neatly and safely when the dryer is pushed flush to the wall.
425 Up / 2X4 Wall / Stacked Dryers
At 4.25 inches deep, it can fit in a 2 X 4 wall once one side of the wall is fitted with a furring strip beneath the drywall. This allows enough room so the duct does not have to be compressed. Check this link for graphic.
Install the model 425 so the bottom lines up about an inch below where the dryer vents. See this INSTALL GUIDE for locations of stackable unit exhausts for the major manufacturers.
This configuration allows the flex hose to compress upward neatly and safely when the dryer is pushed flush to the wall.
425 Down / 2X6 Wall / Stacked Dryer
Check this link for graphic. Turn Dryerbox upside down and be sensitive to height on the wall relative to the exhaust port of the dryer
Perfect for a 2 X 6 wall, install the 425 inverted so the top edge is about one inch above the dryer vent port. See this INSTALL GUIDE for locations of stackable unit exhausts for the major manufacturers.
This configuration allows the flex hose to compress downward into the inverted Dryerbox neatly and safely when the dryer is pushed flush to the wall.
425 Down / 2X4 Wall / Stacked Dryer
At 4.25 inches deep, it can fit in a 2 X 4 wall once one side of the wall is fitted with a furring strip beneath the drywall. This allows enough room so the duct does not have to be compressed. Check this link for graphic.
Turn Dryerbox upside down and be sensitive to height on the wall relative to the exhaust port of the dryer. Install the 425 inverted so the top edge is about one inch above the dryer vent port. See this INSTALL GUIDE for locations of stackable unit exhausts for the major manufacturers.
This configuration allows the flex hose to compress downward into the inverted Dryerbox neatly and safely when the dryer is pushed flush to the wall.
425 Out 2X6 Wall / Stacked Dryer
Be certain there is enough insulation behind dryer for cold climates. Check this link for graphic. It can also be mounted on its side.
Perfect for a 2 X 6 wall, install the 425 so the bottom lines up about an inch below where the dryer vents. See this INSTALL GUIDE for locations of stackable unit exhausts for the major manufacturers.
This configuration allows the flex hose to compress upward neatly and safely when the dryer is pushed flush to the wall.
425 Out 2X4 Wall / Stacked Dryer
At 4.25 inches deep, it can fit in a 2 X 4 wall once one side of the wall is fitted with a furring strip beneath the drywall. This allows enough room so the duct does not have to be compressed. Check this link for graphic. It can also be mounted on its side.
Install the 425 so the bottom lines up about an inch below where the dryer vents. See this INSTALL GUIDE for locations of stackable unit exhausts for the major manufacturers. This configuration allows the flex hose to compress upward neatly and safely when the dryer is pushed flush to the wall.
425 Up / 2X6 Wall / Pedestal Dryer
Perfect for a 2 X 6 wall, install so the bottom of the 425 lines up to match pedestal height (about 14 inches) and about an inch below where the dryer vents.
This configuration allows the flex hose to compress upward neatly and safely when the dryer is pushed flush to the wall.
425 Up / 2X4 Wall / Pedestal Dryer
Install the model 425 so the bottom lines up to match pedestal height (about 14 inches) and about an inch below where the dryer vents.
This configuration allows the flex hose to compress upward neatly and safely when the dryer is pushed flush to the wall.
425 Down / 2X6 Wall / Pedestal Dryer
Perfect for a 2 X 6 wall, install the 425 inverted so the top edge is about one inch above the dryer vent port favoring as low as possible.
This configuration allows the flex hose to compress downward into the inverted Dryerbox neatly and safely when the dryer is pushed flush to the wall.
425 Down / 2X4 Wall / Pedestal Dryer
Turn Dryerbox upside down and be sensitive to height on the wall relative to the exhaust port of the dryer.
Install the 425 inverted so the top edge is about one inch above the dryer vent port favoring as low as possible.
This configuration allows the flex hose to compress downward into the inverted Dryerbox neatly and safely when the dryer is pushed flush to the wall.
425 Out / 2X6 Wall / Pedestal Dryer
Be certain there is enough insulation behind dryer for cold climates. It can also be mounted on its side.
Perfect for a 2 X 6 wall, install the 425 so the bottom lines up about an inch below where the dryer vents and off floor to match pedestal height (about 14 inches).
This configuration allows the flex hose to compress upward neatly and safely when the dryer is pushed flush to the wall.
425 Out / 2X4 Wall / Pedestal Dryer
Be certain there is enough insulation behind dryer for cold climates. At 4.25 inches deep, it can fit in a 2 X 4 wall once one side of the wall is fitted with a furring strip beneath the drywall. This allows enough room so the duct does not have to be compressed. It can also be mounted on its side.
Install the 425 so the bottom lines up about an inch below where the dryer vents and off floor to match pedestal height (about 14 inches).
This configuration allows the flex hose to compress upward neatly and safely when the dryer is pushed flush to the wall.
Model 350
Sku DB-350
(For Upward Exhaust Direction)- 22 gauge aluminized steel weighing 4.14 pounds each
- Top port measures 4 1/8" with very slight oval shape
- Distance from nailing flange to rear of box is 4 1/4"
- Overall measurements: 21" h x 12 1/2" w x 5 1/8" deep
- Inside measures 9 1/2" wide x 18 1/4" tall
- Five units per carton, 36 cartons per pallet, ships as a class 70
350 to Roof in 2X4 Wall
Designed for a 2 X 4 wall, the model 350 has an oval hole to accomodate the way a thin wall cavity compresses the pipe. (Video: Flex Hose Installation Tips) Install the 350 as low as possible so that the bottom tab is at or slightly below the finished floor level.
Since all dryers vent from the center bottom of the appliance, this configuration allows the flex hose to compress upward neatly and safely when the dryer is pushed flush to the wall.
350 Out Through 2X4 Wall
Consider adding a furring strip to stud to make room for the deeper box with round port. It can also be mounted on its side.
Designed for a 2 X 4 wall, the model 350 has an oval hole to accomodate the way a thin wall cavity compresses the pipe. (Video: Flex Hose Installation Tips) Install the 350 as low as possible so that the bottom tab is at or slightly below the finished floor level.
Since all dryers vent from the center bottom of the appliance, this configuration allows the flex hose to compress upward neatly and safely when the dryer is pushed flush to the wall.
350 Up / 2X4 Wall / Stacked Dryer
See this INSTALL GUIDE for locations of stackable unit exhausts for the major manufacturers. Consider adding a furring strip to stud to make room for the deeper box with round port.
Designed for a 2 X 4 wall, the model 350 has an oval hole to accomodate the way a thin wall cavity compresses the pipe. (Video: Flex Hose Installation Tips) Install so the bottom of the 350 lines up about an inch below where the dryer vents. This configuration allows the flex hose to compress upward neatly and safely when the dryer is pushed flush to the wall.
350 Down / 2X4 Wall / Stacked Dryer
Consider adding a furring strip to stud to make room for the deeper box with round port. Turn Dryerbox upside down and be sensitive to height on the wall relative to the exhaust port of the dryer. See this INSTALL GUIDE for locations of exhausts for the major manufacturers.
Designed for a 2 X 4 wall, the model 350 has an oval hole to accomodate the way a thin wall cavity compresses the pipe. (Video: Flex Hose Installation Tips) Install the 350 inverted so the top edge is about one inch above the dryer vent port. This configuration allows the flex hose to compress downward into the inverted Dryerbox neatly and safely when the dryer is pushed flush to the wall.
350 Out / 2X4 Wall / Stacked Dryer
Designed for a 2 X 4 wall, the model 350 has an oval hole to accomodate the way a thin wall cavity compresses the pipe. (Video: Flex Hose Installation Tips) Install so the bottom of the 350 lines up about an inch below where the dryer vents. See this INSTALL GUIDE for locations of stackable unit exhausts for the major manufacturers.
This configuration allows the flex hose to compress upward neatly and safely when the dryer is pushed flush to the wall. It can also be mounted on its side.
350 Up / 2X4 Wall / Pedestal Dryer
Designed for a 2 X 4 wall, the model 350 has an oval hole to accomodate the way a thin wall cavity compresses the pipe. (Video: Flex Hose Installation Tips) Install so the bottom of the 350 lines up to match pedestal height (about 14 inches) and about an inch below where the dryer vents.
This configuration allows the flex hose to compress upward neatly and safely when the dryer is pushed flush to the wall.
350 Down / 2X4 Wall / Pedestal Dryer
Designed for a 2 X 4 wall, the model 350 has an oval hole to accomodate the way a thin wall cavity compresses the pipe. (Video: Flex Hose Installation Tips) Install the 350 inverted so the top edge is about one inch above the dryer vent port favoring as low as possible.
This configuration allows the flex hose to compress downward into the inverted Dryerbox neatly and safely when the dryer is pushed flush to the wall.
350 Down / 2X4 Wall / Pedestal Dryer
Designed for a 2 X 4 wall, the model 350 has an oval hole to accomodate the way a thin wall cavity compresses the pipe. (Video: Flex Hose Installation Tips) Install so the bottom of the 350 lines up about an inch below where the dryer vents and off floor to match pedestal height (about 14 inches).
This configuration allows the flex hose to compress upward neatly and safely when the dryer is pushed flush to the wall.
Model 4D
Sku DB-4D
(For Downward Exhaust Direction)- 22 gauge aluminized steel weighing 4.14 pounds each
- Top port measures 4 1/8" with very slight oval shape
- Distance from nailing flange to rear of box is 4 1/4"
- Overall measurements: 21" h x 12 1/2" w x 5 1/8" deep
- Inside measures 9 1/2" wide x 18 1/4" tall
- Five units per carton, 36 cartons per pallet, ships as a class 70
4D Down in 2X6 Wall
Perfect for a 2 X 6 wall, the model 4D gets installed as low as possible so that the bottom tab is at or slightly below the finished floor level.
Since all dryers vent from the center bottom of the appliance, this configuration allows the flex hose to compress upward then curve back down through the floor neatly and safely when the dryer is pushed flush to the wall.
4D Down in 2X4 Wall
Install as low as possible so that the bottom tab is at or slightly below the finished floor level.
Since all dryers vent from the center bottom of the appliance, this configuration allows the flex hose to compress upward then curve back down through the floor neatly and safely when the dryer is pushed flush to the wall.
Model 3D
Sku DB-3D
(For Downward Exhaust Direction)- 22 gauge aluminized steel weighing 4.14 pounds each
- Top port measures 4 1/8" with very slight oval shape
- Distance from nailing flange to rear of box is 4 1/4"
- Overall measurements: 21" h x 12 1/2" w x 5 1/8" deep
- Inside measures 9 1/2" wide x 18 1/4" tall
- Five units per carton, 36 cartons per pallet, ships as a class 70
3D Down in 2X4 Wall
Designed for a 2 X 4 wall, the model 3D's width accomodates a thin wall cavity. Install the 3D as low as possible so that the bottom tab is at or slightly below the finished floor level.
Since all dryers vent from the center bottom of the appliance, this configuration allows the flex hose to compress upward then curve back down through the floor neatly and safely when the dryer is pushed flush to the wall.
Retrofit Model 400
Sku RB400
(For Upward Exhaust Direction)- 22 gauge aluminized steel weighing 4.14 pounds each
- Top port measures 4 1/8" with very slight oval shape
- Distance from nailing flange to rear of box is 4 1/4"
- Overall measurements: 21" h x 12 1/2" w x 5 1/8" deep
- Inside measures 9 1/2" wide x 18 1/4" tall
- Five units per carton, 36 cartons per pallet, ships as a class 70
Retrofit Model 500
Sku RB500
(For Upward Exhaust Direction)- 22 gauge aluminized steel weighing 4.14 pounds each
- Top port measures 4 1/8" with very slight oval shape
- Distance from nailing flange to rear of box is 4 1/4"
- Overall measurements: 21" h x 12 1/2" w x 5 1/8" deep
- Inside measures 9 1/2" wide x 18 1/4" tall
- Five units per carton, 36 cartons per pallet, ships as a class 70
Retro-Fit Models
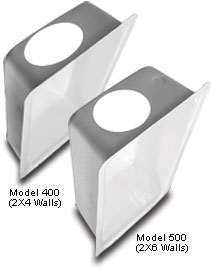
- Read Instruction Sheet -- Model 400 | Model 500 -- Before Ordering
- Alternate method to using the Retro-Fit Box
- Installation and Retro's stories by others
 2X4 Wall Retro-Install?
Some Lowe's locations carry the paintable version of the retro 400 model. See if your Lowe's has it here.